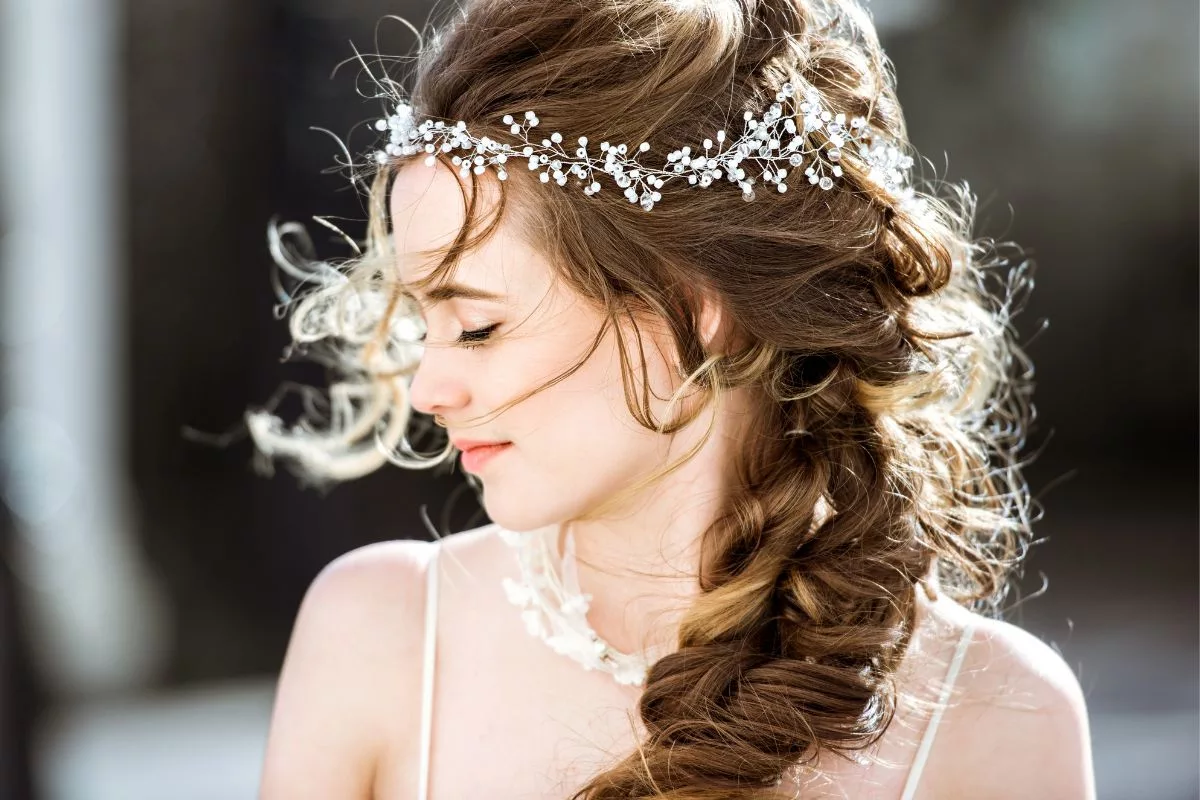
Accentuate Your Beauty with the Best Makeup Brands in the World

There are many makeup brands in the world, and many are being launched every year even a professional makeup artist gets confused about what to pick and what to leave. If you spin your head in the current beauty market, you will see that there are an endless number of products and formulations available than ever before.

Party makeup, bridal makeup, no makeup makeup look, or office makeup look – no matter what type of makeup look you want to achieve, there is a brand with an array of makeup products that can help you achieve the look you desire. So, to ease your quest to find the best makeup brand in the world, here is a hand-curated list of the top makeup brands in the world. From iconic legacy brands to contemporary trendsetters, let’s dive into the enchanting world of makeup brands that have set the beauty industry abuzz.

Also Read: How to buy the best skin care products as per your skin type?

7 Top Makeup Brands in the World

Makeup knows no introduction. In the dazzling realm of beauty and fashion, makeup holds a special place as a transformative technique to express yourself, accentuate your features, and enhance your overall look. Makeup is not just about looking good; it’s a way to show personality, confidence, and creativity. 

So, without further ado, let’s embark on a journey to explore the crème de la crème of makeup brands, each making its mark on the beauty industry and captivating beauty enthusiasts around the world. From impressive newbies to pro makeup artists, this list is a sure-shot answer to how to apply makeup like a pro

Best beauty tips, Top makeup brands in the world,
Best Beauty Brands in the World

Dior: The Epitome of Elegance 

Founded by Christian Dior in 1946, Dior has redefined elegance and luxury. With its Parisian origins, the brand brings sophistication to every product. Dior’s timeless fragrances, opulent cosmetics, and iconic runway looks have set the standard for sophistication and grace. The brand’s signature products, such as the Diorshow Mascara and the Diorskin Forever Foundation, continue to be beloved by makeup artists, marking Dior as a true pioneer in the beauty world.

Product Range

Dior’s product range mirrors its commitment to elegance and luxury. Every Dior product is a masterpiece, from the exquisite foundations and concealers that offer flawless coverage to the velvety eyeshadows that create captivating looks. The brand’s skincare-infused makeup further enhances the user experience, ensuring a harmonious blend of beauty and skincare benefits.

Hero Product: Diorshow Iconic Overcurl Mascara

Why: This mascara epitomizes Dior’s elegance with its curve-enhancing formula, delivering voluminous lashes that frame the eyes, creating a captivating and timeless gaze.

MAC: The Art of Self-Expression

MAC Cosmetics knows no introduction when it comes to creating luxury beauty. Introduced in 1984 in Toronto, MAC Cosmetics has become synonymous with inclusivity and artistic expression. Their luxury finish, extensive shade range, and trend-setting collaborations, like the MAC x Selena collection, have made the brand stand out from other makeup brands, which celebrate their unique identities through makeup.

It is American singer Madonna who gave the first big breaks to M.A.C. by wearing its lipstick for a photo shoot in the late ‘80s. Since then, makeup lovers started noticing the brand.

Trivia

Product Range

MAC’s product range is a canvas for diversity, inclusivity, and creativity, featuring an extensive selection of shades and textures. Whether it’s the versatile Studio Fix Powder Plus Foundation or the vibrant and avant-garde collaborations, MAC ensures that each product is a testament to individual expression. Professional-grade quality is at the heart of MAC, allowing makeup artists to give wings to their creativity.

Hero Product: MAC Ruby Woo Lipstick

Why: Ruby Woo’s vivid red shade complements all skin tones, embodying MAC’s commitment to inclusivity. Its iconic matte finish and lasting power celebrate creative self-expression.

Maybelline: Beauty for Every Day

Founded in 1915, Maybelline has been one of the most loved makeup brands in creating everyday office makeup look and party makeup look alike. From its inception with a mascara formula, the brand has grown to offer a wide range of beauty products, including the iconic Great Lash Mascara, Fit Me Foundation, and so on. Maybelline’s commitment to affordable quality has made it a household name, making beauty accessible to everyone every day.

Thomas Lyle Williams, a chemist, saw his sister Maybel using Vaseline, coal, and ash in her beauty routine. He got amazed and went on creating the first mascara ever, the Maybelline Cake Mascara. And it is how the brand got its name – ‘Maybel’ + ‘Vaseline’ = Maybelline!

Trivia

Product Range

Maybelline’s makeup product range epitomizes accessible glamour for everyday life. From the iconic mascaras that create dramatic lashes to the flattering shades of the Fit Me! Foundation, Maybelline’s amazing product range caters to a wide audience. The brand’s dedication to delivering reliable, high-quality makeup essentials makes achieving glamorous looks effortless for anyone.

Hero Product: Maybelline Fit Me! Matte + Poreless Foundation

Why: This foundation is a go-to for daily glamour, offering a natural matte finish and minimizing imperfections. It is an ultimate beauty staple that embodies Maybelline’s commitment to everyday beauty.

Estée Lauder: Timeless Glamour Estée Lauder

Estée Lauder is a testament to the power of a visionary entrepreneur that combines the essentials of skincare and makeup, focusing on enhancing natural beauty. From the Advanced Night Repair serum to the Double Wear Foundation, Estée Lauder’s beauty essentials bridge the gap between beauty and skincare, offering a holistic approach to timeless radiance. Estée Lauder’s unwavering commitment to research and innovation ensures that each product reflects the brand’s legacy of timeless beauty.

Product Range

Estée Lauder’s product range, like the Advanced Night Repair Serum and the Double Wear Stay-in-Place Foundation, is designed to provide both cosmetic benefits and long-term skincare advantages.

Hero Product: Estée Lauder Double Wear Stay-in-Place Foundation

Why: Renowned for its long-lasting, full coverage and natural-looking finish, this foundation encapsulates Estée Lauder’s dedication to enduring beauty and high-quality formulas.

L’Oréal Paris: Because You’re Worth It 

L’Oréal Paris, with its famous tagline, “Because You’re Worth It,” is one of the most popular makeup brands in the world, with a range of haircare, skincare, and makeup lines. From the iconic Voluminous Mascara to the True Match Super Blendable Foundation, L’Oréal Paris focuses on delivering exclusive self-care products that cater to a global audience, making beauty accessible to all. 

Product Range

L’Oréal Paris’s emphasis on product research, quality, and accessibility makes luxury beauty attainable for everyone. Its product range is a celebration of inclusivity and global beauty. With a wide spectrum of shades and formulations, products like the Voluminous Mascara and the True Match Super Blendable Foundation cater to diverse skin tones and preferences. 

Hero Product: L’Oréal Voluminous Lash Paradise Mascara

Why: With its volumizing formula and soft brush, this mascara captures L’Oréal Paris’s ethos of making luxury accessible, enhancing lashes for a bold, alluring look.

NARS Cosmetics: Artistic Expression

Founded by François Nars in 1994, NARS is a French cosmetics and skin care company that celebrates the art of self-expression through makeup. Known for its provocative shade names and innovative formulations, NARS Cosmetics encourages makeup lovers to step out of their comfort zones and embrace their individuality. The brand’s iconic Orgasm blush and audacious lip colors have become cult favorites, embodying the brand’s ethos of embracing creativity without boundaries. NARS beauty products are known for their rich pigments, luxurious textures, and unique shades that inspire makeup enthusiasts to explore their artistic side.

Product Range

NARS product range embodies the artistry of makeup, featuring a bold array of shades and textures that encourage creative expression. The iconic Orgasm Blush and Audacious Lipstick collection demonstrates the brand’s commitment to pushing boundaries. 

Hero Product: Nars Orgasm Blush

Why: This universally flattering blush, with its golden-pink hue and subtle shimmer, embodies Nars’s artistic expression by adding a luminous flush to cheeks, transcending traditional boundaries.

Urban Decay: Embrace Your Edge

Urban Decay disrupted the beauty industry with its unique range of beauty and makeup products. The brand’s provocative shade names and iconic Naked palettes have carved a niche for Urban Decay in the hearts of makeup artists. By embracing bold colors and unique textures, Urban Decay empowers makeup lovers to express their inner rebels and push the boundaries of traditional beauty norms.

Urban Decay is one of the top makeup brands in the world that is cruelty-free and offers a vegan range as well.

Trivia

Product Range

Urban Decay’s product range exudes beauty and boldness, offering an eclectic mix of shades and finishes. The Naked Eyeshadow Palettes and Vice Lipstick collection showcase the brand’s daring spirit and commitment to pushing beauty boundaries. 

Hero Product: Urban Decay Naked3 Eyeshadow Palette

Why: A cult favorite, this palette’s rosy-hued shades and versatile textures represent Urban Decay’s bold and edgy spirit, inspiring diverse eye looks that push the limits of creativity.

Conclusion

The makeup world is a canvas on which these top makeup brands in the world have painted their legacies of elegance, exclusiveness, and innovation. The unique journey of each of these beauty brands has redefined beauty standards, transformed the way we express ourselves, and empowered makeup artists to express their creativity to the fullest. As you explore the diverse product ranges of these top makeup brands, you’ll find yourself immersed in a world of endless possibilities, where makeup becomes a vehicle for self-expression and a celebration of individuality.

Timeless French Manicure: Step-by-Step Tutorial

French nail art has been a timeless and elegant trend in the world of manicures. With its chic and sophisticated look, it’s no wonder why it has been gaining the attention of girls for decades. Whether you’re preparing for a special occasion or simply want to elevate your everyday style, mastering the art of French manicure will undoubtedly add a touch of glamour to your overall appearance.

So, if you can’t visit a nail studio to get the art done and want to know how to do French nails at home, this blog is for you. In this blog, we’ll take you through a step-by-step guide to doing French nail art, exploring various design ideas, and providing tips for maintaining your stunning manicure. 

Essential Supplies for French Manicure

Before you embark on your French manicure journey, make sure you have the following supplies:

manicure tools
Manicure tools
  • Nail polish colors (for the tips and the main color)
  • Base coat
  • Top coat
  • Nail polish remover
  • Cotton pads or balls
  • Nail file
  • Buffer
  • Cuticle pusher
  • Nail guide strips or tape
  • Fine nail art brush or dotting tool (optional for designs)
  • Accent materials (optional, like rhinestones, decals, etc.)

Step-by-Step Guide to French Nail Art

Before you start doing French nail art, prepare your nails by shaping them to your desired length and filling the edges. Use a cuticle pusher to gently push back your cuticles and create a clean canvas for your manicure. Ensure your nails are clean and dry before starting the process.

Step 1: Apply a Base Coat

A base coat is essential for protecting your nails and creating a smooth surface for the polish. So, don’t forget to apply a thin layer of base coat on each nail and allow it to dry completely.

Step 2: Choose French Tip Style

Even if the nude color and white French tip nails that contrast with the primary nail color are the classic trends, you can get creative with various tip styles, including colored tips, glitter tips, and alternative designs like diagonal or ombré tips. Pink French nails, black French nails, and ombré French nails are high in trend.

Colorful french nails

Step 3: Create the French Tips

Use nail guide strips or tape, place them at the desired angle on your nails to create the French tip line. Apply the chosen tip color (traditionally white) or any color you prefer to the exposed part of the nail. Remove the guide strips or tape while the polish is still wet for clean lines.

If you have a steady hand, you can go with the freehand techniques to create the French tips. Take your time and go slowly to achieve precise lines. If you make any mistakes, use a small brush dipped in nail polish remover to clean up the edges.

Pro Tip

Step 4: Apply the Main Color

Once the French tips are dry, apply the main color to the rest of your nails. Choose a shade that complements the tip color or creates an eye-catching contrast. Apply the polish in thin, even coats for a professional finish.

Step 5: Add Accents and Designs

To take your French nail art to the next level, consider adding accents or nail art designs to one or more nails. Use a fine nail art brush or dotting tool to create intricate designs, or apply rhinestones or decals for an elegant touch.

Nail painting, manicure, pedicure, white nails,
French manicure design

Step 6: Apply the Top Coat

Finish off your French nail art by applying a top coat. The top coat will seal your design, add shine, and extend the longevity of your French manicure. Be sure to cover the tips of your nails with the top coat to prevent chipping.

French Nails Variations and Inspirations

While the classic white-tip French manicure is timeless, you can always experiment with different variations to go creative. Experiment with colored tips, pastel hues, metallic finishes, and even themed designs for holidays and special occasions. Draw inspiration from celebrities and the latest fashion trends to create personalized French manicures.

Nail piercing, nail jewellery,
French nail art with piercing

Challenges and Common Mistakes

Doing a French nail design precisely is a simple yet challenging process. Even the most experienced nail artist can face some challenges and make mistakes during the process. So, don’t bother if you encounter smudges, imperfections, or uneven tips. The key is to remain patient and use a gentle hand when making corrections. Always keep a fine brush or Q-tip dipped in nail polish remover nearby for precise touch-ups. 

Consistency is the key to perfection. The more you practice the art of French manicure nails, the more gracefully you can master the technique.

Remember

Ensuring the Longevity and Maintenance of French Nails

To keep your French nail design looking flawless, you need to follow a few simple maintenance tips.

  • Avoid using your nails as tools to prevent chipping.
  • Wear gloves when performing household chores that could damage your manicure.
  • Moisturize your hands and nails regularly to keep them healthy and hydrated.
  • Remove the nail polish properly using a gentle nail polish remover.

Also Read: A guide on hand care routine and hand care tips!

Conclusion

With this step-by-step guide to French Manicures, you can easily master the technique at home. Embrace your artistic side, experiment with different colors and designs, and have fun! French nail art is not only a style statement but also a reflection of your personality and creativity. So, get ready to flaunt your elegant and chic French nail design with confidence!

Best Juices for Glowing Skin in Summer – DIY Recipes

As the temperature rises in the summer, it becomes essentially vital to take care of our skin to maintain its health and radiance. One of the best and healthiest ways to do this is to consume the best juice for glowing skin and hair. Fresh fruit and vegetable juices are power packed with the goodness of vitamins, minerals, and antioxidants that protect our skin and hair from sun damage and other environmental stressors.

Considering the varied benefits of juices for skin, let’s discover some easy DIY recipes for fruit juices for glowing skin in summer, along with their benefits. Stay tuned till the last of this post to learn how to make the best fruit and vegetable juices for the skin in summer.

Also Read: 10 best face mask recipes you can make at home to get glowing skin

Fruit Juice for Glowing Skin in Summer

Fruit juices are delicious and have numerous benefits for the skin and hair. Fruits like strawberries, oranges, and watermelon are high in vitamins and antioxidants that help protect and nourish your skin. Here are some DIY fruit juice recipes you can make at home to keep your skin healthy and glowing.

Fruit juice good for skin and hair

A. Berries

Berries are some of the most antioxidant-rich fruits, good for maintaining healthy skin. The high intake of vitamin C and anthocyanins in blueberries, strawberries, and raspberries help protect the skin from UV damage and improve its overall appearance.

Blueberry Juice

Blueberries help promote collagen production and protect the skin from damage caused by UV rays and pollution, keeping the skin looking youthful and supple.

Ingredients:

  • 1 cup washed blueberries
  • 1 tablespoon honey
  • 1/2 cup water

Directions:

  • Add the blueberries, honey, and water to a blender.
  • Blend until smooth.
  • Pour the juice into a glass and serve chilled.

Strawberry Juice

Strawberries are a good source of vitamin C and ellagic acid, which help promote collagen production, reduce inflammation and protect the skin from UV damage.

Ingredients:

  • 1 cup strawberries
  • 1/2 lemon
  • 1 tablespoon honey
  • 1/2 cup water

Directions:

  • Wash the strawberries and remove the stems.
  • Squeeze out the lemon juice.
  • Add the strawberries, honey, lemon juice, and water to a blender.
  • Blend until smooth, and your strawberry juice is ready to be served.

Raspberry Juice

Raspberries help protect the skin from free radical damage, promote collagen production and help improve skin elasticity.

Ingredients:

  • 1 cup raspberries
  • 1/2 grapefruit
  • 1 tablespoon honey
  • 1/2 cup water

Directions:

  • Wash the raspberries and peel the grapefruit.
  • Add the raspberries, grapefruit, honey, and water to a blender.
  • Blend until smooth and serve chilled.

B. Citrus Fruits

The high vitamin C intake in citrus fruits helps improve collagen production and skin health. They also contain other antioxidants and phytochemicals, which are essential to protect the skin from UV rays and other environmental stressors.

Orange Juice

Oranges help promote collagen production and improve skin texture and tone. They also contain folate, which helps promote healthy cell growth.

Ingredients:

  • 2 oranges
  • 1/2 lemon
  • 1 tablespoon honey
  • 1/2 cup water

Directions:

  • Peel the oranges and remove any seeds.
  • Squeeze the juice from the lemon.
  • Add the orange juice, lemon juice, honey, and water to a blender.
  • Blend until smooth.
  • Strain the juice to remove any pulp.
  • Pour the juice into a glass and serve.

Grapefruit Juice

Grapefruits help protect the skin from damage caused by free radicals and promote healthy skin cell growth.

Ingredients:

  • 1 grapefruit
  • 1/2 lime
  • 1 tablespoon honey
  • 1/2 cup water

Directions:

  • Peel the grapefruit and remove any seeds.
  • Squeeze the juice from the lime.
  • Add grapefruits, lemon juice, honey, and water to a blender.
  • Blend until smooth.

Lemon Juice

Lemons help reduce the appearance of aging signs such as fine lines and wrinkles. They also contain citric acid, which helps exfoliate the skin and promote a brighter and even complexion.

Ingredients:

  • 2 lemons
  • 1 tablespoon honey
  • 1/2 cup water

Directions:

  • Squeeze the juice from the lemons.
  • Mix lemon juice, honey, and water well.
  • Pour the juice into a glass and drink chilled.

C. Tropical Fruits:

Tropical fruits like pineapple, mango, and papaya contain enzymes that help exfoliate the skin, remove dead skin cells, and promote cell turnover. They also contain vitamins A and C, which help brighten the skin and reduce the appearance of fine lines and wrinkles.

Pineapple Juice

Pineapple is a tropical fruit rich in enzymes and antioxidants that help reduce inflammation, promote collagen production, and improve skin texture.

Ingredients:

  • 2 cups chopped pineapple
  • 1/2 lemon
  • 1 tablespoon honey
  • 1/2 cup water

Directions:

  • Peel the pineapple and cut it into chunks.
  • Squeeze the juice from the lemon.
  • Add the pineapple, lemon juice, honey, and water to a blender.
  • Blend until smooth.

Mango Juice

Mangoes not only taste good but also do good for your skin and hair health. They are a good source of vitamin A, essential for skin health, and vitamin C, which helps reduce inflammation and promote collagen production. 

Ingredients

  • 2 ripe mangoes, peeled and chopped
  • 1/2 cup of water
  • A squeeze of lime juice

Directions:

  • Peel off mangoes and cut them into pieces.
  • Blend the mangoes until smooth.
  • Add a few drops of lime juice to enhance the flavor.

Papaya Juice

Papaya is a rich source of vitamins A and C and an enzyme called papain, which helps exfoliate the skin and promote cell turnover.

Ingredients

  • 1 small ripe papaya, peeled and chopped
  • 1/2 cup of water
  • A squeeze of lemon juice

Directions:

  • Peel off the papaya and cut it into small pieces.
  • Add the papaya, lemon juice, and water into a blender.
  • Blend until smooth and serve chilled.

D. Recipes for Fruit Juices

Adding variety to your diet can be easy and delicious. Do it by mixing different fruits together and forming the best juice for skin health. Here are some easy-to-follow recipes to help you incorporate more fruits into your diet for glowing skin in summer.

Blueberry and Orange Juice

Blueberries and oranges are excellent sources of vitamin C and antioxidants that can help protect your skin from damage caused by free radicals.

Ingredients

  • 1 cup of blueberries
  • 2 oranges
  • 1/2 cup of water

Directions:

  • Wash the blueberries, oranges, and water until smooth.
  • Strain the juice to remove any pulp.
  • Serve chilled.

Pineapple and Mango Juice

Pineapple and mango juice for skin is a delicious and nutritious way to take care of your skin in summer.

Ingredients

  • 1 small pineapple, peeled and chopped
  • 2 ripe mangoes, peeled and chopped
  • 1/2 cup of water

Directions:

  • Peel off pineapple and mangoes and cut them into pieces
  • Blend the pineapple, mangoes, and water until smooth.
  • Add ice and serve chilled.

D SuperFruit – Pomegranate 

The delicious fruit – Pomegranate, is categorized as a “superfruit” and is highly nutritious. Pomegranate juice contains antioxidants, vitamins, and minerals that offer several health benefits.

Pomegranate Juice

Pomegranates help protect the skin against damage from free radicals, improve blood circulation, and lead to a healthy glow in the skin.

Ingredients:

  • 1 pomegranate
  • 1 cup water
  • 1 teaspoon honey (optional)

Directions:

  • Remove the seeds from the pomegranate.
  • Place the seeds, honey, and water into a blender.
  • Blend until the seeds are broken and combined with the water.
  • Strain the juice to remove any solids. 
  • Serve the juice in a glass, and enjoy!

Note: Pomegranate juice can be quite tart, so adding honey can help sweeten the juice to taste. Consuming pomegranate juice in moderation is important, as it is high in natural sugars.

Vegetable Juice for Glowing Skin in Summer

While fruit juices are delicious and nutritious, vegetable juices are good to maintain skin, hair, and overall health, especially in the hot summer months. Here are some DIY recipes of vegetable juices you should consume in summer for glowing skin and healthy hair.

vegetable juice good for skin and hair
Vegetable juice good for skin and hair

A. Green Leafy Vegetables

Green leafy vegetables are a good source of nutrients, essential for healthy glowing skin. From spinach to arugula, green vegetable juices help promote healthy skin and hair during the hot summer.

Spinach Juice

Spinach is a great source of vitamins, minerals, and iron, essential for healthy skin and hair. It also contains vitamins A and C, which help promote collagen production.

Ingredients:

  • 2 cups spinach leaves
  • 1 lemon
  • 1 inch ginger

Directions:

  • Wash the spinach leaves thoroughly.
  • Squeeze out the lemon juice.
  • Peel and chop the ginger.
  • Add all the ingredients into a blender and blend until smooth.

Kale Juice

It is a nutrient-dense leafy green packed with antioxidants, vitamins, minerals, vitamins A, C, and K. Kale juice for glowing skin help maintain healthy skin and hair. 

Ingredients:

  • 2 cups kale leaves
  • 1 cucumber
  • 1 green apple (optional)
  • 1 lemon juice

Directions:

  • Wash the kale leaves thoroughly.
  • Peel and cut cucumber and green apple into small pieces.
  • Add all the ingredients to a blender.
  • Blend until smooth and serve chilled.

Arugula Juice

Arugula is a peppery leafy green rich in vitamins and minerals and vitamins A, C, and K, essential for healthy skin and hair. It helps maintain skin elasticity and reduces the appearance of fine lines.

Ingredients:

  • 2 cups arugula leaves
  • 1 cucumber
  • 1 lemon
  • 1-inch ginger

Directions:

  • Wash the arugula leaves thoroughly.
  • Peel and chop the cucumber and ginger.
  • Squeeze out the lemon juice.
  • Add all the ingredients to a blender.
  • Blend until smooth and serve immediately.

B. Cruciferous Vegetables

Cruciferous vegetables are a good source of antioxidants and vitamins essential for maintaining healthy skin and hair.

Broccoli Juice

Broccoli juice helps reduce inflammation, improves skin elasticity, and protects the skin from damage caused by free radicals.

Ingredients:

  • 1 head of broccoli
  • A handful of parsley
  • 1 green apple
  • 1 lemon
  • 1-inch of ginger

Directions:

  • Wash the broccoli and green apple and cut them into small pieces.
  • Peel and chop the ginger.
  • Add the broccoli, apple, ginger, lemon, and parsley into the blender.
  • Blend well and serve.

Cauliflower Juice

Cauliflower helps reduce skin damage caused by UV radiation. It also helps promote healthy hair growth. So, great vegetable juice to add to your daily hair care routine as well.

Ingredients:

  • 1 head of cauliflower
  • 1 cucumber
  • 1 lemon
  • A handful of mint leaves

Directions:

  • Wash and chop the cauliflower into small pieces.
  • Peel off the cucumber and cut it into pieces.
  • Add cauliflower, cucumber, lemon juice, and mint leaves to the blender.
  • Mix well and serve chilled.

Cabbage Juice

Cabbage juice for glowing skin helps reduce skin inflammation and promotes collagen production. It is also rich in sulfur, which promotes hair growth.

Ingredients:

  • 1 head of cabbage
  • 1 green apple
  • 1 lemon
  • A handful of cilantro leaves

Directions:

  • Wash and chop the cabbage and apple into small pieces.
  • Juice the cabbage, apple, cilantro leaves, and lemon.
  • Serve chilled.

C. Root Vegetables

Root vegetables are packed with essential vitamins and minerals that help maintain healthy skin and hair. 

Carrot Juice

Carrot juice is rich in vitamin A, which helps prevent premature aging, reduce skin inflammation, and promote healthy hair growth.

Ingredients:

  • 4-5 carrots
  • 1 Indian gooseberry (amla)
  • 1-inch piece of ginger
  • Mint leaves

Directions:

  • Chop the carrots and amla into small pieces while removing the stems and seeds.
  • Peel the ginger and cut it into small pieces.
  • Blend the carrots, amla, mint leaves, and ginger until smooth.
  • Pour the juice into a glass and serve chilled.

Beetroot Juice

Beetroot juice is rich in iron vitamins A, C, and K, which help improve blood circulation and promote healthy skin.

Ingredients:

  • 2 beetroots
  • 1 green apple
  • 1 lemon
  • A handful of mint leaves

Directions:

  • Peel off the beetroots.
  • Cut the beetroot and green apple into small pieces.
  • Juice the beets, apple, mint leaves, and lemon.
  • Serve chilled.

Ginger Juice/Cucumber Juice

Ginger and cucumber have been used for centuries for skin care due to their amazing cooling and anti-inflammatory properties as well as other health benefits. Adding ginger juice to your summer skin care routine will help detoxify your body and promote healthy skin. 

Ingredients:

  • 1-inch piece of ginger
  • 1 lemon
  • 1 cucumber
  • A handful of mint leaves

D. Recipes for Vegetable Juices

If you want to advance your summer skin care routine by consuming some more vegetable juices, mixing the different veggies together can be a great choice to form the best juice for skin. Also, these juices will leave you feeling refreshed and rejuvenated. So, let’s discover some easy and delicious recipes for vegetable juices for the skin you can make at home using simple ingredients. 

Spinach and Ginger Juice

Juice made of spinach and ginger forms a refreshing drink that gives you a burst of energy on a hot summer day. Spinach and ginger are the best juices for skin that not only promote glowing skin but also tantalize your taste buds with their delicious, tangy flavor.

Ingredients:

  • 2 cups of spinach
  • 1 medium-sized ginger root
  • 1 cucumber
  • 1 carrot
  • 1 Indian gooseberry (amla)
  • 1 lemon
  • Mint leaves

Directions:

  • Wash the spinach leaves thoroughly.
  • Cut the cucumber, carrot, and amla into small pieces.
  • Peel the ginger and cut it into small pieces.
  • Squeeze the lemon juice and crush some mint leaves.
  • Add the spinach, ginger, cucumber, carrot, and amla to the blender.
  • Add lemon juice and crushed mint leaves.
  • Blend well until smooth and serve chilled.

Carrot and Beetroot Juice

Carrot and beetroot juice is a nutrient-rich drink that helps improve your skin health and beat the heat as well. This bright, colorful vegetable juice is packed with essential nutrients, vitamins, minerals, and antioxidants that are essential for glowing skin and your overall well-being.

Ingredients:

  • 2 medium-sized carrots
  • 1 medium-sized beetroot
  • 1 lemon

Directions:

  • Peel the carrots and beetroot and cut them into small pieces.
  • Squeeze the lemon juice.
  • Add the carrot and beetroot to the blender and blend well until smooth.
  • Mix the lemon juice and pour the juice into a glass 

Kale and Cucumber Juice:

Kale and cucumber juice is not only refreshing but also helps keep the body and skin hydrated during the hot summer days.

Ingredients:

  • 2 cups kale leaves
  • 1 cucumber, peeled and chopped
  • 1/2 lemon
  • 1 green apple, chopped
  • 1/2-inch piece of ginger
  • 1 cup water

Directions:

  • Wash the kale leaves thoroughly.
  • Peel off the cucumber and ginger
  • Cut the ginger, cucumber, and green apple into small pieces.
  • Add all the chopped ingredients into a blender.
  • Add 1 cup of water to the juicer and some lemon juice.
  • Run the juicer until mixed well.

Make sure to use only fresh and organic fruits and vegetables when making the best juices for skin as non-organic fruits and vegetables may contain harmful pesticides, which are not good for skin health.

B. Super Vegetable – Cucumbers

Cucumber is actually considered a fruit and is classified as a gourd. In terms of the best juice for glowing skin, cucumber is often grouped with leafy greens due to its high water intake and nutrient content.

Cucumber Juice

Cucumber juice helps improve skin elasticity and reduce inflammation. Due to their amazing cooling and hydrating properties, cucumbers have been used as an active ingredient in many home remedies for the skin. 

Ingredients:

  • 1 cucumber
  • 1/2 lemon
  • 1 tablespoon honey
  • 1/2 cup water
  • Mint leaves

Directions:

  • Peel off the cucumber and cut it into pieces.
  • Squeeze the lemon juice.
  • Add the cucumber, mint leaves, lemon juice, honey, and water to a blender.
  • Blend until smooth and serve chilled.

Tips for Making Fruit and Vegetable Juices

juice for skin and hair, how to make juice at home,
How to make best juice for skin and hair
  • Use fresh and organic ingredients to ensure the highest nutrient content for skin, hair, and overall well-being.
  • If it’s too thick or concentrated, add water or ice to dilute the best juice for glowing skin 
  • Experiment with different combinations of fruits and vegetables to find what works best for your skin and your favorite flavors.
  • After preparing fruit juices and vegetable juices for the skin, consume them immediately to get the maximum benefits and nutrient absorption.

Dos and Don’ts for Making The Best Juices for Skin

Do’sDon’ts
Choose a variety of fruits and vegetables to form the best juices for skin.Never overdo the sweetness of juices by overdoing the sugar
Use fresh, and organic fruits and veggies.Don’t take juices as a meal replacement
Mix fruits and vegetables for a balanced flavor.Don’t merely depend on juices and skip eating whole fruits and vegetables.
Drink plenty of water alongside juicesJuices are not meant to be used as a thirst quencher.
Add healthy fats and protein to juicesDon’t add sugar to the juices.

By following these dos and don’ts when drinking the best juices for skin, you can rest assured that you are getting the most out of your summer juices and maintaining a healthy balance in your daily diet for glowing skin.

Caution for Juice Consumption 

  • While fruit and vegetable juices skin are packed with several health benefits, you should not use them as a replacement for whole fruits and vegetables, meals, and water.
  • Juicing removes some of the fiber and nutrients found in the whole product. So, it is vital to include whole fruits and vegetables in your diet.
  • Be mindful of the sugar content in fruit juices. Fruits contain natural sugars that can be concentrated in juice form. So, drink fruit juices in moderation and balance them with other low-sugar or sugar-free beverages.
  • If you have any medical conditions, consult with your nutritionist or a healthcare professional first before making any significant changes to your daily diet or lifestyle.

Final Thoughts

Consuming fruit and vegetable juices in summer is a great way to maintain healthy and glowing skin. The best juices for skin help protect your skin from sun damage, reduce inflammation, delay aging signs, and improve overall skin appearance. So, try making the best fruit and vegetable juices for glowing skin at home by following the above-listed DIY juices recipes, and you’ll be on your way to glowing skin.

You may like reading: Oily Skin Care Tips for Summer: Keep Your Skin Fresh and Glowing

Benefits of Natural Skin Care Products – An Ultimate Guide

No matter what your age or gender or what stage of life you’re in, using the best natural skin care products can make all the difference in the way our skin looks and feels. Whether you have oily skin, acne-prone skin, or sensitive skin, natural skin care is a way to unlock the healthy glowing skin of your dreams. 

On average, we use around 10 different beauty products on our skin daily, and we barely bother to check out what goes inside to formulate these products or what ingredients our skin care products contain. But do you know whatever we apply to our skin, around 60% of that gets absorbed into our body, leaving a lasting impact on our overall well-being? 

However, with the rising awareness of organic beauty and the multiple benefits it offers to users, now more and more people are switching to natural skin care products. It is always best to switch from chemical-based skincare products to organic skin care products. And we bet once you embrace organic skin care, you will fall in love with your skin.

According to Statista, the global market value of natural and organic skin care products is expected to grow by $20.4 billion dollars by 2030.

Wondering why is this? Here are the best benefits of natural skin care products that will give you enough reasons to make this much-needed switch now, if not yet. But before we begin, let’s first discover the list of harmful ingredients to avoid and natural ingredients to look for in skin care products:

Harmful Ingredients

Many skin care and beauty products available in the market today are loaded with chemicals and harmful ingredients that can cause damage to the skin. These ingredients are:

Harmful ingredients, chemical based skin care products, sulphare, parabeans,
Say No To Chemical Based Skin Care Products
  • Parabens: Paraben is a common preservative found in skincare products, and they are linked to hormonal imbalances and other health issues. 
  • Synthetic Fragrances: Artificial fragrances can cause allergic reactions and skin irritation.
  • Sulfates: Sulfates can strip off the natural oil of the skin, leading to dryness and irritation. 
  • Phthalates:  Phthalates are commonly found in synthetic fragrances and have been linked to reproductive issues. 

To stay safe from the skin-damaging impacts of these ingredients, you should check out the ingredient lists and make sure your chosen skincare products are free from these additives.

Natural Skin Care Ingredients

Natural skin care ingredients are often organic, plant-based ingredients that provide a range of benefits to the skin. Some common examples of these ingredients are:

  • Jojoba Oil: Jojoba oil acts as a great natural moisturizer for face that helps balance the skin’s natural oils. 
  • Chamomile: Chamomile is a natural anti-inflammatory that works to soothe and calm the skin. 
  • Green Tea: Green tea is a natural antioxidant that helps delay premature aging and protect the skin from damage.
  • Aloe Vera: Aloe vera is one of the most beneficial natural ingredients found in almost all natural skin care products. The anti-inflammatory properties of this plant help soothe and hydrate the skin. 

Also Read: Discover the Amazing Uses and Benefits of Aloe Vera for Skin, Hair, and Health

Benefits of Natural Skin Care Products

Organic skincare has been the hottest beauty trend in recent years. It has taken the beauty industry by storm due to the fact that natural skin care products are better for the skin in all ways. It is safe to use, environmentally friendly, and keeps the skin glowing. Let’s discover the multiple benefits of using natural skin care products.

skin friendly ingredients, natural ingredients for face,
Skin Friendly Natural Ingredients

No Side Effects

Natural skin care products easily get absorbed into the skin and give miraculous effects when with zero side effects or risk of developing any skin allergies. On the other hand, beauty products that contain complex chemical substances are not easily accepted by the skin, and our body reacts negatively, causing acne, rashes, inflammation, redness, and irritation, amongst several other skin concerns.

Prevents Premature Ageing

We can stop aging signs like fine lines, wrinkles, blemishes, etc., to appear. Aging is a natural process, but premature aging is an alarming sign reflective of severe underlying skin concerns. Hence, we should take apt steps to prevent premature aging. While the beauty market is mushroomed with limitless anti aging products, and some of them also work but many times, the toxic chemicals found in those products do more harm than good.

While natural skincare products have been found to be very effective in preventing premature aging without exposing our skin to potentially problematic substances.

Healthy and Glowy Skin

Natural skincare products formulated with aloe vera, coconut oil, turmeric, rose water, etc., help us achieve the flawless skin we all dream of. When we add these substances to our natural skin care routine, most of our skin concerns disappear, leaving us with radiant, glowy, and healthy skin.

Safe for the Skin

No synthetic formulations, no complex chemicals, and no artificial aroma, natural skin care products are completely safe for the largest organ of our body – The Skin. No matter whether you have acne prone skin, sensitive skin or any other skin type, you can never go wrong with organic skin care. They are all safe and natural. Moreover, when you use them regularly, you will notice a significant reduction in itching, acne, irritation, and allergic reactions in your skin.

With so many benefits of natural skin care canvassed above, making the switch from synthetic to organic seems to be an ideal move – both for humans and for the environment.

Top Natural Skin Care Brands in the Market

With the ever-increasing hype of adopting organic beauty trends, it is no longer a tough task to find the best brands of natural skin care products. There are many brands in the market formulating cruelty-free skin care, sustainable itema, and natural skin care products like natural cleansers, moisturizers, facial kits, etc.

Some of the top natural skin care products brands on the market include Oriflame Facial Kit, Nature Essence Facial Kit, The Moms Co Under Eye Cream, Moms Co Toner, Lotus Herbals Facial Kit, Botanical Skincare, Mamaearth Tea Tree Moisturizer, Khadi Moisturizer, Olay Natural Aura Day Cream and so on. These products contain a range of natural ingredients that provide a variety of benefits for the skin, including hydration, exfoliation, and anti-aging properties.

You May Like Reading: Top 10 Moisturizers for Face for Glowing Skin

What Are the Differences Between “Organic,” “Natural,” “Green,” and “Clean” Skin Care?

When it comes to skincare, terms like “organic,” “natural,” “green,” and “clean” are often used interchangeably. However, in the world of sustainable beauty and natural skin care, all jargons used have different meanings. Getting the literal meanings of these teams can be a little confusing for someone who is new to the world of natural skin care routine.

To clarify the confusion between all these terms, here’s what each of the terms means:

  • Organic Products: Organic skin care products are made from natural ingredients that are grown without the use of pesticides or synthetic fertilizers. 
  • Natural Products: Natural products mean that some or all of the ingredients used in the products are derived from plants and animals. Natural skin care products can be organic or non-organic in nature.
  • Green Products: Green products are environmentally friendly and often made using renewable resources and sustainable practices. In green products, the concept includes everything right from ingredients to packaging, practices, business strategies, and more.
  • Clean Products: Clean products have a strict list of ingredients that are kept out while formulating the product. Some examples of these ingredients that are toxic are artificial fragrances, harmful additives, and parabens.

Understanding the differences between all these skin care terms will help you make more informed decisions about the products you use on your skin.

DIY Natural Skin Care Recipes:

Now that you know the importance of natural skin care and some of the reputed brands sell 100% natural skin care products, it is time to discover some DIY recipes for natural beauty products. There are many easy DIY recipes you can prepare using natural ingredients commonly found in your kitchen or garden. 

Some of the top DIY skin care recipes include homemade face masks, natural face toner, rose water, etc. 

These DIY skin care products are made using natural ingredients that are safe and gentle on the skin, delivering a range of benefits, including cleaning, hydration, exfoliation, and so on. 

Related Article: 10 best face mask recipes you can make at home to get glowing skin

Final Thoughts

Natural or organic skin care products offer a wide range of skin care benefits such as hydration, protection from damage, anti-aging properties, and so on, by switching from chemical-based beauty products to natural skin care products that are free from synthetic fragrances, harmful additives, and preservatives, you can keep all your skin concerns at the bye and unlock your way to healthy, radiant skin of your dreams. 

Whether you choose to purchase natural skin care products from the beauty market or make one at home, you will notice the difference in your skin tone and texture soon. You will fall in love with yourself, and your skin will thank you.

You may also like: 5 Best DIY Protein Treatments for Hair and Benefits

Home Remedies for Dandruff – 11 Best DIY Recipes

A complete black outfit or that LBD (little black dress) is all’s favorite, but nothing can be a spoilsport like those tiny white flakes shedding on your shoulders. Well, dandruff (medically referred to as seborrhoea or cradle cap in children) is a common hair concern, causing itchiness, dry scalp, hair fall and other hair problems in men, women, and children alike, leaving them to ask one common question “How to control dandruff and hair fall?” Answer: “Home remedies for dandruff.”

Don’t panic; it is all organic.

While people often recommend a lengthy list of hair care products, anti-dandruff shampoos, and chemical solutions to reduce dandruff, nothing can do wonders like natural home remedies for dandruff do. 

Yes, it is tempting to reach out for an anti-dandruff shampoo during your next visit to the supermarket, but if anti-dandruff shampoos fail to kick out those tiny white flakes, turn to your kitchen and try home remedies for dandruff and itchy scalp. 

Before we discover some DIY recipes for dandruff control, let’s plunge into the causes and symptoms of dandruff because many times, we don’t know that those white tiny flakes have found their place in our scalp until the problem gets severe. Also, we will share a list of top-selling anti-dandruff shampoos which claim to reduce dandruff once and for all. 

So, scroll down to comb through it all.

Also Read: Summer Hair Care Routine – Every Man & Woman Should Know

Causes of Dandruff and Itchy Scalp  

There are many reasons for dandruff and itchy scalp; it can range from lifestyle habits to genetic conditions. But to put it simply, when too many bacteria or fungi accumulate on the oily scalp, it causes an itchy scalp, which further leads to flakiness and dandruff. 

Here’s a quick chart to help you understand the underlying causes of dandruff 

Causes of DandruffDescription 
Oily ScalpWhen too much oil accumulates on the scalp, it combines with dead skin cells and gives a breeding ground for bacteria and fungus build-ups, which can trigger dandruff.
Dry ScalpWhen your scalp doesn’t produce enough natural oils, it gets dry and flaky, causing dandruff.
Skin DiseasesSkin problems like psoriasis or eczema can also lead to dandruff by causing inflammation and flaking of the skin.
Fungal InfectionsFungal infections like seborrheic dermatitis are also a prime cause of dandruff. This is a skin and hair condition characterized by red, greasy skin covered with flaky white or yellow flakes.
Hair ProductsCertain hair products, like hair gels, hairsprays, and hair styling creams, can irritate the scalp and cause dandruff.
Hormonal ChangesHormonal changes occurred during puberty, pregnancy, or menopause can also lead to dandruff.
Environmental FactorsSeveral environmental factors like pollution, stress, etc., can also trigger dandruff and itchy scalp in some people.

These are a few of the most common causes of dandruff and itchy scalp, which will help you find the most effective treatment for dandruff based on your specific conditions.

how to control dandruff and itchy scalp
Dry scalp treatment at home

Symptoms of Dandruff

While dandruff has united over half of the world’s population, irrespective of age, race, or  gender, its symptoms vary from person to person. The most common symptoms of dandruff include:

Symptoms Description 
FlakingFlaking can range from a few white flakes on your scalp or hair to more visible flakes falling onto your clothing.
RednessRedness or inflammation on the scalp can be a sign of a fungal infection or other underlying hair problems.
Greasy or oily scalpDandruff can sometimes cause an oily or greasy scalp, which can make your hair look dirty and unappealing.
ItchingItching is one of the most common symptoms of dandruff. It can be mild or severe; either way constant urge to scratch is uncomfortable and embarrassing.
DrynessDandruff can also cause dryness and flakiness on the scalp, especially in winter or dry climates.

If you notice any of these symptoms, seek medical assistance or look for a natural remedies for dandruff to treat this scalp condition. Home remedies can be a safe and effective way to control mild cases of dandruff, but if symptoms are severe, medical attention can be your best bet.

Home Remedies for Dandruff

No matter what causes dandruff, using natural dandruff remedies is the best best way to get rid of dandruff. Home remedies for dandruff are highly effective, and the best thing about these remedies is that they can be made at home using some simple ingredients found in your kitchen or garden.

So, let’s discover some easy DIY recipes for dandruff control:

1. Coconut Oil

It is an excellent natural remedy for dandruff, which has antimicrobial properties that helps fight the dandruff-causing fungi. Additionally, coconut oil is rich in vitamin E, which helps improve scalp and hair health.

dandruff removal home remedies,
coconut oil for dandruff control,
Coconut oil – dandruff removal home remedies

DIY Coconut Oil Recipes for Dandruff

  • Warm up some coconut oil
  • Rub it to your scalp for a few minutes.
  • Leave it for at least 30 minutes and wash it off with a gentle shampoo. 
  • Repeat the process once or twice a week for best results.

2. Aloe Vera

This amazing plant is a natural moisturizer, used as an active ingredient not only in skin care products but also in the hair care range. Filled with anti-inflammatory and antifungal properties, aloe vera helps calm an itchy scalp, reduce inflammation, fight fungi, and control dandruff.

Aloe vera gel, DIY dandruff treatment,
Aloe vera gel – DIY dandruff treatment

DIY Aloe Vera Recipes for Dandruff

  • Scoop out fresh aloe vera gel from the plant.
  • Apply it directly to your scalp and massage for a few minutes. 
  • Leave it on for 30 minutes and rinse it off.

Realted Article: Discover the Amazing Uses and Benefits of Aloe Vera for Skin, Hair, and Health

3. Apple Cider Vinegar

Apple cider vinegar is another effective treatment for dandruff and an itchy scalp. It contains acetic acid, which helps reduce the build-up of fungi and bacteria and balance the pH level of your scalp, preventing dandruff.

home remedies for hair dandruff,  Apple cider vinegar for dandruff control,
Apple cider vinegar for dandruff control

DIY Apple Cider Vinegar Recipes for Dandruff

  • Mix an equal amount of water and apple cider vinegar.
  • Pour it over your scalp 
  • Leave it in for 20-30 minutes, and then wash it off using a mild shampoo.

There is no enough research to back up the effectiveness of apple cider vinegar in dandruff control. But apple cider vinegar is anecdotally proven to remove dead skin cells and balance the pH of your scalp to reduce dandruff.

4. Aspirin

Aspirin contains salicylic acid, an ingredient found in many skin care products and anti-dandruff shampoos. This acid is highly effective in the treatment of seborrheic dermatitis and dandruff.

anti dandruff home remedies, aspirin for dandruff
Anti dandruff home remedies

DIY Aspirin Recipes for Dandruff

  • Crush two tablets of Aspirin.
  • Mix it to your regular shampoo and wash your hair with it.
  • Let it sit for 2 minutes, then rinse it out.

5. Tea Tree Oil

Tea tree oil has antifungal and antiseptic properties that help soothe an itchy scalp, reduce inflammation, and control dandruff.

Tea tree oil for dandruff control,
Tea tree oil for dandruff control

DIY Tea Tree Oil Recipes for Dandruff

  • Mix a few drops of tea tree oil with a carrier oil, such as coconut oil or olive oil.
  • Apply the mixture to your scalp and rub it with your fingers.
  • Leave it on for at least 30 minutes and wash it off with a gentle shampoo. 

Mix a few drops of tea tree oil with your regular shampoo. Lather it to work, leave it on for 5 minutes, and then rinse it with cold water.

6. Baking Soda

Baking soda has antifungal properties that help exfoliate dead skin cells, relieve itching and skin irritation, and reduce the amount of fungus on the scalp that can cause dandruff.

baking soda for itchy scalp, baking soda for dandruff
Baking soda for itchy scalp

DIY Baking Soda Recipes for Dandruff

  • Wet your hair 
  • Apply a handful of baking soda onto your scalp. 
  • Leave it on for a few minutes, then rinse it off with water.

7. Lemon Juice

Lemon juice is another natural home remedy for dandruff which helps regulate the pH balance of the scalp and reduce the growth of yeast that can contribute to dandruff.

dandruff treatment at home
Lemon Juice: dandruff treatment at home
  • Squeeze out the lemon juice and apply it to your scalp.
  • Leave it on for a few minutes.
  • Now, rinse it off with water. 

Lemon juice can be drying, so it’s best to use it in moderation and follow up with a conditioner to prevent dryness and further scalp irritation. 

8. Olive Oil

In addition to being a healthy supplement to a balanced diet and an effective remedy to add in your summer skin care routine, olive oil is a remarkable therapy for dandruff also and a one-step solution for healthy hair. It helps moisturize and soothe an itchy, flaky scalp, as well as reduce the discomfort produced by the fungus.

dandruff treatment at home,
Best remedy for dandruff

DIY Olive Oil Recipes for Dandruff

  • Warm up a small amount of olive oil.
  • Apply it to your scalp, working your way from roots to tips.
  • Leave it on for 30 minutes to an hour, and rinse it off with shampoo.

Also Read: Benefits of Olive Oil for Overall Wellbeing

9. Yogurt

Curd or yogurt is an amazing ingredient that works for all hair and skin types. Its cooling and anti-inflammatory properties help treat the problems of dry scalp and dandruff. Also, it contains natural probiotics that are known to regulate the levels of yeast on the scalp that causes dandruff.

Yogurt hair mask for dandruff control,
Yogurt hair mask for dandruff control

DIY Yogurt Recipes for Dandruff

  • Apply plain yogurt to your scalp or mix it with mashed papaya.
  • Leave it on for 30 minutes.
  • Now, rinse it off with water and shampoo.

10. Fenugreek Seeds (Methi)

Fenugreek seeds have anti-inflammatory and antifungal properties that help nourish hair and reduce dandruff. What’s more? Thai natural remedy helps repair hair follicles, prevent hair fall, and promote hair regrowth.

dandruff treatment at home in hindi,
Permanent solution for dandruff at home

DIY Fenugreek Seeds Recipes for Dandruff

  • Soak a handful of fenugreek seeds in water overnight.
  • Blend the soaked methi to form a smooth paste.
  • Apply the paste to your scalp and leave it on for 30-60 minutes.
  • Wash it off with water and shampoo. 

11. Neem Leaves

No skin care and hair care range can ever be complete without quoting about neem leaves. Neem has antibacterial and antifungal properties known to relieve itchiness, reduce redness, and control dandruff.

Neem leaves for itchy scalp,
Neem leaves for itchy scalp

DIY Neem Leaves Recipes for Dandruff

  • Grind some leaves of neem and add them with a tablespoon of honey.
  • Mix them well to form a thick paste. 
  • Apply the paste to your scalp and leave it on for 15-20 minutes. 
  • Wash it off with cold water.

Boil neem leaves in water for 10-20 minutes. Let the water cool down and transfer it to a spray bottle. Spray it every time before you wash your hair for a more hydrated scalp.

Lifestyle Changes to Reduce Dandruff

Now that you know some of the most effective home remedies for dandruff treatment, here are what lifestyle changes you need to make to keep your locks right. It will help not only prevent dandruff but also reduce its occurrence.

Diet

Your diet plays a crucial role in maintaining your skin, hair, and scalp health. A poor diet can trigger several hair concerns, including dandruff and itchiness, while a well-balanced diet rich in vitamins and minerals helps improve the overall scalp health and reduce dandruff.

Making changes to your diet and adding healthy foods like fatty fish, nuts, omega-3, fresh fruits, and green leafy vegetables can help reduce inflammation and prevent fungal infections, which leads to control dandruff.

Hygiene

Following healthy hygiene practices is also a contributing factor that helps reduce dandruff. Regularly washing your hair and avoiding the use of harsh chemicals will maintain your hair and scalp health. Furthermore, avoid sharing towels, combs, brushes, and other hair care products to reduce the risk of spreading dandruff.

Stress Management

Stress is one of the key causes of triggering several skin issues and hair problems like hair fall, dandruff, split ends, etc. Stress decreases your body’s ability to fight off infections and may weaken your immune system, which causes dandruff. Finding ways to manage stress, such as traveling, practicing yoga, meditation, and doing exercise for hair health can help reduce the control of dandruff and other hair problems.

Precautions and Tips

While home remedies are the effective treatment of dandruff, you should keep certain precautions and tips in mind to get the best result.

  • Avoid using harsh chemicals on your scalp, such as hair color treatment, hair dyes, or hair styling products that contain alcohol. Chemically loaded products can irritate your scalp and exacerbate dandruff.
  • Be regular and consistent with your dandruff treatment at home. It may take weeks or months to reduce dandruff before you see improvement. So, have patience and stick to your chosen home remedy for dandruff.
  • If you have tried anti-dandruff shampoos, home remedies for dandruff, and made lifestyle changes, but still, dandruff persists, it is wise to seek medical attention. Your dermatologist can help you find the underlying cause of your dandruff and suggest the best medication.

Side Effects of Using Home Remedies for Dandruff

While home remedies for dandruff are considered safe and effective, they may cause some allergic reactions in some people. For example, some natural remedies, like apple cider vinegar, tea tree oil, etc., can cause inflammation and irritation in some people. Hence, you should do patch tests before you try any of these home remedies to avoid any adverse reactions. And if you experience any discomfort or irritation, discontinue use and seek medical assistance at once.

Caution

While home remedies for dandruff are easy and effective to use, they may not work for everyone. If your dandruff symptoms are severe or persist even after a few regular uses of natural remedies, you should seek medical attention. 

When to See a Doctor for Dandruff Treatment

If you’re still scratching and shedding after trying home remedies for dandruff, see your doctor. For those stubborn tiny flakes, you may need to use a topical medication or prescription shampoo. Most likely, your doctor can suggest you any over-the-counter anti-dandruff shampoo formulated with different active ingredients for effective dandruff treatment.

Some of the effective ingredients found helpful in controlling dandruff are:

  • Coal tar preparations (Denorex Therapeutic Protection, Neutrogena T/Gel, Scytera)
  • Salicylic acid and sulfur (Sebex, Sebulex)
  • Pyrithione zinc (Selsun Blue for Itchy Dry Scalp, Neutrogena T/Gel Daily Control Dandruff Shampoo, Head & Shoulders)
  • Salicylic acid (Neutrogena T/Sal )
  • Ketoconazole (Extina, Nizoral A-D, Xolegel)
  • Selenium sulfide (Dandrex, Head & Shoulders Clinical Strength, Selsun)

You should switch between the types of shampoos if one type proves effective at first but loses its effectiveness later.

Top 11 Anti-Dandruff Shampoos with their Price List

Anti-dandruff ShampooPriceAction
GK Hair Anti Dandruff Shampoo 3315Buy Now
Man Matters Advanced Anti Dandruff Shampoo and Hair Massager For Men599Buy Now
L’Oréal Professionnel Scalp Advanced Anti-Dandruff Dermo-Clarifier Shampoo695Buy Now
Dr Batra’s Dandruff Cleansing Shampoo120Buy Now
Teenilicious Anti Dandruff Shampoo for Women & Men409Buy Now
Scalpe Pro Daily Anti-dandruff Shampoo with conditioning base497Buy Now
Bare Anatomy EXPERT Anti-Dandruff Shampoo429Buy Now
Selsun Suspension Anti Dandruff Shampoo343Buy Now
Sebamed Anti-Dandruff Shampoo480Buy Now
Bodywise Anti Dandruff Shampoo359Buy Now
RE’ EQUIL Dandruff Control Shampoo498Buy Now
Hair dandruff solution

Final Thought

Dandruff can be an embarrassing scalp condition, but fortunately, there are several natural home remedies for dandruff that can help reduce its occurrence. Additionally, making some lifestyle changes and practicing healthy habits can also help control dandruff and itchy scalp. Remember to be regular and consistent with your hair treatments for the best result. 

With patience and persistence, you can achieve a healthier, dandruff-free scalp.

Also Read: 5 Best DIY Protein Treatments for Hair and Benefits

How To Make Homemade Toner For Face

Following a proper skincare routine is crucial for every man and woman to maintain healthy, glowing skin. And homemade toner for face is an important skin care product found in every skin care routine. Be it the daily CTM (cleaning, toning, moisturizing) routine or the basic beauty routine, no skin care regimen can be complete without the use of toner. Still, homemade face toner is one of the most underrated products in the world of skin care. 

CTM is a common phrase you will often find in every beauty blog and magazine. While cleansing and moisturizing are the general steps that each one of us follows, toning is something that we often overlook. 

So why should we use Toner? Because it’s a magical beauty tonic! Toners help balance the pH level of the skin, remove excess oil, and eliminate deep-seated dirt, as well as prepare the skin for the application of other skincare products. 

While the skin care market is overloaded with a wide variety of facial toners, making a DIY homemade toner for your face at home is a great way to feed your skin with nature’s wonders. If you have dry skin, sensitive skin, or acne-prone skin, homemade toner is simply bliss for you.

Use homemade toner for the face right after cleansing and before applying moisturizer when the skin is a little damp. It will help the product penetrate deeper into the skin. 

GlamUp Gallery

In this blog, we will share homemade face toner recipes, but first, have a quick view of the benefits of facial toners.

face toner benefits

Related Article: An Ultimate Guide on Facial Toner Uses & Benefits

Benefits of Homemade Toner for Face

While there are many types of toners available on the skin care market, they are often expensive and chemically loaded, causing irritation to the skin. Using homemade face toner is a safe, natural, and cost-effective way to care for your skin. DIY toners are not just gentle on the skin but also customized to address your specific skin concerns and suit your skin type.

Let’s dive deeper to learn how to make face toner at home – a step-by-step process. 

Homemade face toner for sensitive skin

Sensitive skin is prone to itching, redness, acne, inflammation, irritation, and whatnot. Therefore, using a natural face toner, made at home can be the best option for caring for sensitive skin. Since people with sensitive skin are prone to inflammations and irritation, using soothing ingredients like aloe vera, cucumber, etc., can be the best rescue for them.

Aloe vera toner

Right from the garden to your kitchen, aloe vera is packed with antioxidants and anti-inflammatory properties, making it a must-have product for all skin types, particularly sensitive skin. Aloe vera toner helps calm, hydrate, and soothe skin irritation while serving its basic purpose of maintaining pH levels and removing excess dirt.

How to make Aloe vera toner?
  • Take half a cup of freshly scooped aloe vera gel.
  • Add it to half a cup of rose water.
  • Mix it well and pour it into a spray bottle.

Related Article: Discover the Amazing Uses and Benefits of Aloe Vera for Skin, Hair, and Health

Cucumber toner

Another natural ingredient known for its calming and hydrating properties is cucumber. Using cucumber toner for your face twice a day will keep all your sensitive skin concerns at bay.

How to make cucumber toner?
  • Grate one fresh cucumber
  • Squeeze out its water
  • Now add 3-4 tablespoons of fresh aloe gel to it.
  • You can add a few drops of homemade rose water, also.
  • Mix them well and transfer the liquid to a sanitized bottle.

Homemade toner for dry skin

Store-bought face toner often contains alkaline or acidic, making dry skin conditions worse. People with dry skin should use natural face toner with mild ingredients like vitamin E and rose to address dry skin concerns.

Rose Toner

Rose is not just an epitome of love but also a powerful ingredient to pamper skin. Known for its calming and hydrating properties, rose petals form a magic potion that has the natural ability to maintain pH level of the skin.

How to make rose water toner?
  • Take half a cup of homemade rose water.
  • Add half a cup of witch hazel. 
  • Mix them well and pour them into a bottle for daily use.

Rice water toner

Rice water is an amazing natural ingredient for dull, dry, and tired skin. It helps brighten and whiten complexion as well as reduce the appearance of blemishes. Give rice water toner a place in our daily skin care routine, and it will leave you feeling fresh all day long.

According to a 2018 study, “rise water is a beneficial anti-aging ingredient “biocompatible with the human skin.” 

Home to make rise water toner?
  • Soak one cup of clean rice in distilled water.
  • Keep stirring until the water becomes cloudy. 
  • Strain the water out and pour the liquid into a bottle. 

Homemade toner for oily skin

Oily skin produces excessive sebum, making it susceptible to acne and breakouts. To prevent oily skin concerns, use homemade face toner using natural ingredients like tea tree oil, green tea, rose water, etc., that fight acne-causing bacteria and control oil production.

Tea tree oil toner

Oily skin? No worries! Tea tree oil will take care of it! People with oily skin find one thing common in their skin care products, i.e., tea tree oil. Packed with antibacterial properties, tea tree oil not only helps fight acne-causing bacteria but also reduces blemishes, dark spots, and acne scars, making it a must-have for oily skin people. 

How to make tee tree oil toner?
  • Take half a cup of apple cider vinegar. 
  • Mix it with half a cup of distilled water.
  • Add a few drops of tea tree oil and shake them well.
  • Transfer the liquid to a spray bottle for regular use.

Green tea toner

Green tea is loaded with anti-inflammatory and antioxidant properties that help lock in the moisture, remove excess oil, and soothe the skin. Also, it helps destroy free radicals and delivers youthful, glowing skin.

How to make green tea toner?
  • Take a cup of boiled water.
  • Steep two green tea bags in it for 5-10 minutes. 
  • Let the water cool down, and remove the tea bags from it.
  • Transfer the liquid to the bottle and refrigerate it for daily use.

There are many DIY toners you can make at home. Choose the ingredients as per your skin type and concerns, and make one at home. Remember to make them in smart quantity and not use them for more than a week.

Some quick tips associated with the best uses of facial toner

  • Store the toner in a cool and dry place or the refrigerator for the best result.
  • Use homemade face toner twice a day.
  • When using homemade face toners, do a patch test first to ensure they don’t irritate your skin. 
  • Use the DIY toner within a few weeks to prevent bacterial growth.
  • If you have dry skin, a natural homemade toner or an alcohol-free toner is the best choice for you.

Conclusion

These are a few of the most common homemade face toner recipes for oily skin, dry skin, and sensitive skin types. Choose the right ingredients-based DIY homemade toner for the face as per your skin type, catering to your specific skin concerns, and see the difference they make in your skin’s health and appearance.

Also Read: How to Do Facial at Home: A Step by Step Facial Tutorial

Best 7 Benefits of Rose Water for Face to Up Your Skincare Routine

Rose water is nothing but a water-like solution infused with the goodness of rose petals that work wonders for the skin and hair. The benefits of rose water for face are enormous, and it has taken the skincare and beauty industry by storm. It is why, this natural skin care ingredient has been used for centuries to promote healthy, glowing skin. 

Filled with medicinal and therapeutic properties, rose eater is a secret ingredient found in various cosmetics, medicines, and beauty and skincare products. Also, this magical water is one of the most commonly used ingredients in all types of DIY face mask recipes and forms the best natural toner to maintain skin pH levels. 

But apart from being a secret ingredient in beauty and skin care products, this beauty tonic offer a gazillion other advantages. So, let’s discover the other uses and benefits of rose water for skin.

The best thing about rose water is that it is suitable for all skin types.

GlamUp Gallery

Top 7 Benefits of Rose Water for Face

Rose water benefits for the face work wonder with a long-term application, especially when used overnight. It can help nourish, hydrate, and soothe irritated skin while promoting a radiant complexion and delaying the occurrence of aging signs. 

Let’s dive deeper to know the multifarious benefits of rose water for face.

1. Maintains pH level of the Skin

Since rose water is an amazing natural skin toner, it has astringent and pH-balancing properties. When used as a facial toner, rose water helps remove deep-seated impurities and excess oil from the face and thus reduces skin breakouts like whiteheads, blackheads, discoloration, acne scars, dark spots, and other skin concerns, delivering radiant, glowing skin. 

2. Soothes Irritated Skin

This magical beauty potion is filled with antibacterial and anti-inflammatory properties, which help soothe irritated skin, calm sunburns, and reduce redness on the skin. Applying rose water to irritated and inflamed skin instantly gives a cooling effect and helps reduce burns and itchiness. It is also known to alleviate the symptoms of skin diseases like rosacea and eczema. However, more research is needed to support its effectiveness in treating these skin diseases.

3. Balances Natural Oils

Bless your skin with the best benefits of rose water for face to balance its natural oils. No matter whether you have dry skin or oily skin, rose water helps keep it nourished and hydrated. Use it as a facial mist throughout the day to keep your skin refreshed and reenergized. 

4. Delays Aging Signs

Rich in antioxidant properties, rose water is an effective anti-aging skin care product used to prevent cell damage which causes aging signs. Add this natural remedy to your daily skin care routine, and it will smoothen fine lines and reduce the appearance of wrinkles. Also, rose water helps heal wounds and fade age spots.

Related Article: A Complete Anti Aging Guide For The Best Skin Care

5. Prevents and Treats Skin Infections

Rose water is filled with goodness of antiseptic properties, thus, helping prevent and treat infections. It is why rose water is often used in medicinal skin care products. Even rose water is used as eye drops to treat conjunctivitis cases. The benefits of rose water as an antiseptic and analgesic agent are numerous. So, if you are dealing with acne flare up, use this natural remedy to treat the condition.

6. Unwind and De-stress 

Do you know rose water is also an antidote for daily stress caused by exhaustion or a hectic work schedule? Use it to de-stress yourself from the tension in your brain and body. Apply a little rose water to your neck, behind the ears, and on your wrist, and lay back. Its sweet fragrance will kick out all your stress of the day. 

7. Removes Makeup 

We all know that rose water is an amazing ingredient to up our skin care game. But do you know it has found its place in the makeup vanity also? Yes, rose water is an amazing makeup remover for all skin types, particularly for sensitive and acne-prone skin. If you have dry, sensitive, or acne-prone skin, finding a makeup remover that can suit your skin type is a real pain, and using the wrong type of makeup remover can cause skin breakouts. So, using natural rose water is a great way to gently remove makeup from the face without causing any concerns. 

Caution

It is good to do a patch test before you add rose water to your daily skin care routine as, in some cases, it can cause allergic reactions too.

GlamUp Gallery

How to Make Rose Water at Home?

Rose water is a natural, fragrant beauty tonic used for centuries in skincare and aromatherapy. The rose water is made by distilling rose petals that form refreshing liquid for the skin. Let’s see step by step process to make rose water at home.

You Will Need

  • 2 liters of distilled water
  • Petals of 10 roses

Step by step process to make pure rose water at home

  1. Select fresh rose petals and clean them properly.
  2. Add the clean petals and distilled water to a saucepan. (Just take that much which is can cover the petals.) 
  3. Simmer the water and petals for 30-40 minutes until the petals turn their color.
  4. Now, turn off the gas stove and let it cool off.
  5. Now, strain the water into a sterilized spray bottle, and your DIY rose water made at home is ready to use.
  6. Refrigerate and use it to up your skin care game.

How to Use Rose Water on Your Face?

Rose water is a natural beauty tonic that you can use in various ways. Facial mist, rose water toner, and an ingredient in the DIY face mask are some of the most common rose water uses for face. 

  1. As a facial mist: Sprinkel rose water spray onto your face to refresh and hydrate your skin throughout the day.
  2. As a toner: Dab a cotton ball in rose water and apply it to your face after cleansing. It will help remove deep-seated impurities and balance the pH of your skin.
  3. As a DIY face mask: Add a few drops of rose to your homemade face mask and apply it to your face as you do with the face mask.

Final Thought

Rose water is a natural beauty tonic used for centuries as an active ingredient in the skin care aisle. This natural remedy helps hydrate, nourish, refresh, and soothe irritated skin as well as promote radiant and glowing skin from within. 

Use it as a facial mist, as a natural toner or add it to your homemade face pack for glowing skin; it will bless your skin with its multifarious benefits in either way. So make it a part of your daily skin care routine now and enjoy the many benefits of rose water for face

Makeup for Beginners: Tips & Tutorial

Makeup is not only a way to enhance your natural features but also a form of self-expression whether you are a professional makeup artist or just starting to experiment with different makeup products, it is essential to know the right techniques of how to apply makeup like a pro.

Keeping that in mind, here is a step-by-step tutorial on makeup for beginners that will help you get the best makeup look and get you familiar with how to use different makeup products like a professional makeup artist. 

But first, the pre-makeup steps

Pre-Makeup Steps For Beginners

Before starting with makeup steps, it is essential to prep your skin properly by regularly following a skin care routine as per your skin type. A skincare routine that includes cleansing, toning, moisturizing, and other essential steps of skin care will help you get the healthy and glowing skin of your dreams. 

Before you start learning the basics of makeup application, you need to know about the cosmetic products and other essentials needed to do the makeup. This list will help you in creating your makeup kit as well.

makeup for beginners

A Complete List Of Makeup Products For Beginners

To get the best makeup looks, it is vital to choose the best makeup products that suit your skin type and tone. Choosing the right beauty products and brushes can make a big difference in achieving the desired makeup look. So, here is a complete list of makeup products for beginners you will need to get a flawless finish.

  • Primer
  • Concealer
  • Foundation
  • Highlighter or bronzer
  • Blush
  • Lipstick, lip liner, 
  • Eyeliner
  • Mascara 
  • Kohl
  • Eyeshadow palette 
  • Makeup brushes 
  • Beauty blender or applicator
  • Setting spray 

Now without further ado, let’s start with makeup steps for beginners

Basic Application Steps of Makeup for Beginners

Step 1: Primer

To get the perfect makeup look, start by applying an even layer of primer to get a smooth base and make your makeup stay last longer.

Step 2: Foundation

Next, apply a light layer of foundation matching your skin tone or tinted moisturizer to get a natural-looking base. Blend it using a beauty blender or makeup brush.

Also Read: 5 Tips For Buying The Best Makeup Foundation For You

Step 3: Concealer

Now, use concealer to cover any scars, blemishes, pigmentation, or dark circles. Apply it using your fingertips or a small makeup brush and blend it evenly.

Step 4: Powder

To get a matte base, set your foundation by applying a light dusting powder. Use a powder puff or large makeup brush to apply it. Your base makeup look is ready to go ahead with lip makeup and eye makeup looks.

Step 5: Makeup Blush

Now, apply soft blush to the apple of your cheeks. Make sure to choose a shade like pink, rosy red, etc that complements your skin tone.

Step 6: Eye Makeup

It’s time to do eye makeup now; the toughest part of the makeup routine. Apply kohl, eyeshadow, eyeliner, and mascara to do eye makeup. For a more dramatic look, you can use artificial lashes and eyelash curlers also. 

Eye makeup
Eye makeup looks

To get a complete guide on how to do an eye makeup look, visit Eye Makeup Looks for Beginners – Tips and Tutorial

Step 7: Lipstick

No makeup look is complete without adding a dash of color to your lips. Choose a lipstick color that matches your skin tone and swipe it to your lips. 

To get a perfect lip makeup look, read Lip Care – Be Kiss Ready!

Step 8: Setting Spray

Don’t forget to use a setting spray or setting powder to keep your makeup last longer and prevent it from smudging.

These are just the basic makeup steps for beginners; to get a detailed step-by-step makeup tutorial, visit How To Apply Makeup – A Step By Step Guide

By knowing the step-by-step makeup application and regularly practicing the different products and techniques, you can create a flawless makeup look that’s uniquely yours. 

Makeup Tips and Tricks

We all fall short somewhere, but some extra makeup tips will come in handy. So, whenever you’re ready to start, follow these valuable makeup tips for beginners to create a flawless makeup look that will turn heads in the crowd.

eye makeup products
Makeup Tips

Know your skin tone

Understanding your skin tone and type will help you make a better decision for choosing the right makeup products. The right hue of beauty products or cosmetics like lipsticks, eyeshadows, etc. will complement your natural glow.

Related Article: 5 Skin Types – How to Take Care of Your Skin?

Let your moisturizer set the base of your makeup

A lightweight moisturizer is a great skincare product preventing your makeup from drying out. Applying moisturizer under your makeup will create a smooth base and make your makeup last longer throughout the day without creating a dry or cakey effect.

Use the right makeup brush set for beginners

Choosing the correct makeup brush and sponges can do a job a lot easier. Different brushes are made for different specific purposes, so you need to use them cautiously. For instance:

  • The flat shadow brush is helpful to even out the base of your eyelid.
  • The angled liner brush helps with precisely applying eyeliner closer to your lash line.
  • The big flat brush is good at applying loose powder 

With the right makeup brush, you can apply all your makeup products correctly and precisely.

Apply eyeliner in short strokes

Applying eyeliner is one of the most critical steps of applying makeup, so even some simple tips can go a long way in helping you master this technique. When starting with applying eyeliner, we suggest you go in shorter strokes, it will help you get the more precise line you desire.

Use lip liner before lipstick

It’s always a good practice to define your lip line using a lip liner first before you use lipstick. This way, you will only need to bother about filling in between the lines only. Also, lip liner prevents your lipstick from smudging.

Apply a base eyeshadow on your eyelids

Creating a base on your eyelids by applying a lighter shade of eyeshadow like beige or white will help make your top eyeshadow shade pop brighter. 

Learning the ins and outs of makeup can be intimidating, and the hundreds of YouTube makeup tutorials don’t make things easier either. However, a few simple makeup tips can up your makeup game, giving you a helpful base to start with. 

The basic makeup tips for beginners mentioned here will help you master the art of makeup like a pro. From daily makeup looks to occasional glitz and glam, these beauty tips will go a long way n helping you get the desired look.

Don’t hesitate to step out of your comfort zone and try new things. With regular practice and patience, you can turn from a beginner to a makeup pro in no time!

GlamUp Gallery

Final Thought on Makeup for Beginners

Voila! Now you know all the essential steps of makeup for beginners, beauty tips, and techniques needed to apply makeup like a professional artist. So, why wait? Start practicing today and be set to rock the world with your newfound makeup look.

You may also like: Semi Permanent Makeup – The Hottest Tattoo Trend

Oily Skin Care Tips for Summer: Keep Your Skin Fresh and Glowing

Summer is a great time of year, filled with the fun of outdoor activities, trips to the beach, breezy cocktails, cold showers, and sunshine. While most of us love summer, people with oily skin are definitely not a fan of what the hot and humid weather does to their skin. The scorching and blistering heat can cause several skin issues, including excess oil production, acne breakouts, clogged pores, shiny and greasy skin, and whatnot. It is why oily skin care tips in summer have been one of the most searched terms on search engines during the summer season. 

10 Best Oily Skin Care Tips For Summer

Considering the above-stated facts, here are some oily skin care tips to form an effective skin care routine for summer that will keep your skin looking fresh and shine-free throughout the season. Follow these tips and enjoy the summer without worrying about skin concerns. 

skin care, skincare, Summer skin care tips, summer skin care routine, skincare, skin care, summer skin care products, summer skin care for oily skin, summer skin care for dry skin, skin care in summer, skin care products, summer skin,
Summer skin care tips

1. Keep Your Skin Clean

Summer skin care for oily skin starts with cleansing the skin. Even if it seems like a natural step of a skin care routine, doing it right is essential. Some people think that washing the face frequently will help keep the oily skin concerns at the bye, but it is a misconception. Cleansing your face twice a day is enough to remove excess oil, dirt, and impurities caused by sweat, dust, and pollution. Don’t ever increase the frequency of face cleansing as it may strip off the natural moisture from your skin, causing it to produce more oil. Cleansing your face twice a day with a gentle face wash is adequate. However, you can use a face mist or a mild toner to refresh your skin for the rest of the day.

Avoid using hot water, and pick a gentle, oil-free, and non-comedogenic cleanser that suits your oily skin type. 

2. Use a Facial Toner

Some people often assume that using a toner is an unnecessary extra step of a skincare routine. However, a facial toner goes a long way in balancing your skin’s pH levels and removing deep-seated dirt or impurities. Moreover, this gentle skin care product also helps tighten pores, control excess oil production, and tighten pores. 

For oily skin, use a toner that contains witch hazel or salicylic acid.

3. Exfoliate Regularly

Exfoliation is a crucial step in any skincare routine, but make sure not to over-exfoliate. Excessive exfoliation can cause flaking, redness, scarring, inflammation, and discoloration. When done in moderation, exfoliation helps remove dead skin cells, prevent breakouts, and unclog pores. 

Opt for a gentle scrub or chemical exfoliant once or twice a week to slough away dead skin cells. 

4. Apply Light Moisturizer

People with oily skin often have the misconception that using moisturizer will make their skin much oilier. Hence, they need to add moisturizer to their daily skin care routine. But do you know skipping moisturizer can cause your skin to produce more oil in order to compensate for the hydration loss? So, the solution does not lie in skipping the moisturizer rather, use a lightweight and oil-free moisturizer specifically formulated to suit oily skin type. 

When buying moisturizer for oily skin in summer, look for ingredients like glycerine or hyaluronic acid that helps hydrate skin without adding oil.

5. Use Sunscreen for Summer Sun Protection

The scorching sun in summer can cause various skin concerns, from sunburns to premature aging and skin cancer. Therefore, to protect your skin from harmful UV rays, never miss applying a broad-spectrum sunscreen even when you are not directly in contact with the sun. also, reapply it after every 2 hours when in the sun. It will help delay aging signs occurrence and provide healthy skin from within.

Use a lightweight and non-greasy formula with a minimum of SPF 30 or more that will give maximum sun protection without causing breakouts and clogging pores.

6. Redefine Your Makeup Routine

To prep your oily skin for summer, you need to redefine your makeup routine. Avoid adding too many layers of makeup products and embrace the minimalist makeup trend. In addition, avoid using heavy and oil-based cosmetics and pick lightweight and oil-free formulas. Use mattifying powder to control shine throughout the day.

Related Article: How To Apply Makeup – A Step By Step Guide

7. Try Micellar Water

Micellar water is a comparatively new addition to the skin care industry, which has proven to be a boon for oily skin care in summer. Micellar water helps wipe wipe-off the excess oil, sweat, and dirt that built up on the skin. The best part is it can be easily applied and does not require to be rinsed off. 

Drink 64 oz of water daily to hydrate your skin from the inside out.

8. Use Face Mask

Natural homemade face masks are the best bet to help you deal with oily skin problems in summer. DIY face masks made with sandalwood, multani mitti, aloe vera, etc., will give your skin a mattifying effect while removing impurities and delivering naturally healthy glowing skin in summer. 

Pro Tip,

Don’t touch your face over and above again as it will bacteria and oil from your hands to your face.

9. Blot Oil Away to Control Shine

how to know your skin type
Botting paper

When it comes to summer skincare, blotting paper is your bae. It is a valuable makeup essential for oily skin care. This magical tool helps control excess oil to your skin, making you feel fresh and shine-free all summer long. You can use blotting paper throughout the day but don’t overuse it, as it can strip your skin of its natural oils. Prefer using blotting paper made from natural ingredients like rice paper and stay away of using tissues, which can be harsh to your skin. 

10. Sweat-Proof Your Makeup

Summer and sweat go hand in hand, so when during makeup in the hit months, making your makeup sweat-proof should be your prime concern. The best way to sweat-proof your makeup is to use waterproof makeup such as waterproof mascara, waterproof eyeliner, transfer-proof lipstick, lightweight primer, oil-free foundation, and so on. The waterproof beauty products will help your makeup stay in the palace for longer whilst allowing your skin to breathe, minimizing the chance of trapping dust, oil, and sweat.

Don’t forget to use a setting spray to keep your last longer, preventing it from melting with sweat.

Final Thought

These are some of the tried and tested oily skin care tips in summer suggested by skin care experts and beauty bloggers alike. You can combine these tips with your basic skin care routine, but before you make any significant change in your daily skincare, we advise you to consult with your dermatologist first.

Bonus Tip

Don’t miss taking your 7-8 hours of beauty sleep every night. 

Overall, oily skin care in summer requires some effort and attention; but your skin deserves this much-needed pampering. By following some simple steps regularly, you can easily keep your oily skin issues at bay and unlock a healthy and radiant glow.

Also Read: Essential Steps of Skin Care Routine For Men


Eye Makeup Looks for Beginners – Tips and Tutorial

When it comes to enhancing one’s beauty or creating a dramatic makeup look, eye makeup looks can make all the difference. Do you know eye makeup is essential to all types of makeup routines, including a no-makeup makeup look? 

The right eye makeup look can help accentuate your eyes, brighten up your look, make your eyes look bigger and more expressive, as well as add a touch of drama to your overall look. Indeed, eye makeup is a great way to enhance your natural features and create different charismatic looks for different occasions. 

However, creating a perfect eye makeup look for different occasions that can draw attention is not so easy. But worry not, in this blog post, we’ll explore some popular eye makeup looks and learn how to do eye makeup step-by-step. Whether you’re a makeup beginner or an experienced makeup artist, you’ll find good eye makeup tips in this guide that you can try.

Eye makeup, eyeshadow look
How to Apply Eyeshadow

How to Do Eye Makeup

Eye makeup is a fun and creative way to enhance your natural features. Listed below are some general eye makeup looks and the steps to recreate the look. You can customize the look mentioned here to suit your personal style and eye shape. So, let’s get started to experiment with colors, techniques, and tools to create beautiful eye makeup looks.

Related Article: How To Apply Makeup – A Step By Step Guide

Eye Makeup Products 

To get started with your eye makeup look, you’ll need a few key products: 

  • An eyeshadow palette with dark shades
  • Eye makeup primer and concealer
  • A neutral eyeshadow palette
  • Smoky shades eye palette 
  • An eyeliner pencil or gel
  • Mascara
  • Glittery eyeshadow and glitter glue. 
  • Eyelash curler
  • Q-tips (for touch-ups)
  • Makeup brushes

Here are some most popular eye makeup looks you can try recreating on different occasions:

Smokey Eyes Makeup

The smokey eye makeup look is a timeless look that’s perfect for trying while dining out or at a night party. Also, it is one of the easiest eye makeup looks to recreate.

Smokey eye makeup
Smokey eye makeup

How to Recreate a Smokey Eye Look?

  • Apply a neutral eyeshadow base to your eyelid. 
  • Use a dark eyeshadow shade like grey, blue, black, or brown on the outer corner and blend it inwards. 
  • Apply the same color to the lower lash line to create a smoky effect.
  • Create a winged effect using your eyeliner pencil or gel on your upper lash line. 
  • Finally, apply a few coats of mascara to your eyelash to finish off the look. 
  • You can use false lashes also for a more dramatic look.

Natural Eye Makeup

If you prefer a more natural feature, the natural eye makeup look is the best choice for you. This makeup look is for beginners who want to enhance their natural beauty without going overboard.

Natural eye makeup
No-makeup makeup look for eyes

How to Recreate a Natural Eye Look?

  • Apply a light, neutral eyeshadow across your eyelids. 
  • Use a slightly darker shade in the crease of your eyes.
  • Define your upper lash line by using your eyeliner pencil.
  • Now, apply mascara to finish off the look.

Natural eye makeup is perfect for an everyday look or an office party where you want to look polished without being too dramatic.

Bold Eye Makeup

Bold eye makeup is a great way to add drama to your look and create a statement from your unique appearance. This look is all about using daring techniques and experimenting with bright and bold colors like pink, orange, yellow, blues, green etc. With bold eye makeup, you can go as creative as you like to create a fascinating look that stands out. So, don’t hesitate to mix and match colors to create your unique look. Remember, the key to doing bold eye makeup look is to use bold colors and create sharp lines.

Bold eye Makeup
Bold Eye Makeup Look

How to Recreate a Bold Eye Look?

  • Prep your eyelids with a primer or concealer.
  • Apply your desired eyeshadow colors all over your eyelids. Use the lightest shade as a base color, a medium shade to define your crease, and a darker shade on the outer corner to intensify the look. 
  • Next, use thick eyeliner to define your upper lash line or to create a winged look.
  •  Finally, curl your upper and lower lashes using mascara to complete the look. 
  • For a more dramatic look, you can add a pop of color to your waterline. 
  • Don’s miss using false eyelashes to add some drama to the look.

Pro Tip

Since your bold eye makeup is the focus of your face, keep the rest of your makeup minimal. Opt for nude or light pink lipstick to keep the attention on your eyes.

Glittery Eye Makeup

A glittery eye makeup look is a fun and playful way to add some sparkle and glamour to your eyes. This type of eye makeup look is perfect for girls who love to experiment with different textures, and who want to make a statement with their eye makeup. Be it subtle shimmer or full-on sparkle, glittery eye makeup is a great choice for special occasions such as weddings, parties, and festivals.

Glittery Eye Makeup Look

How to Recreate a Glittery Eye Look?

  • Apply eye makeup primer across your eyelids.
  • Now, apply a sparkly eyeshadow or glitter all over your eyelid. To create more depth and definition, you can use a darker shade on the outer corner. 
  • Blend it in outwards and upwards directions. Add some extra sparkle by applying glitter to the underneath your lower lash line and the inner corner of your eyes.
  • Apply eyeliner along your upper lash line.
  • Now, finish off the look with coats of mascara. 

With regular practice and some creativity, you can master the glittery eye makeup look that will turn heads in the crowd.

Cat Eye Makeup

Cat eye makeup is a classic eye makeup look that adds a touch of drama and elegance to any style. The best thing about eye makeup is that it goes well with all types of outfits, occasions, and moods. You can customize it to suit your unique eye shapes and preferences. Cat eye makeup is created by applying winged eyeliner that accentuates the eyes and gives them a dramatic, feline look.

Eye makeup, mascara,
Cat eye Makeup Look

How to Recreate a Cat Eye Look?

  • Prep your eyelids with a primer or concealer. 
  • Next, apply eyeliner across your lash line, beginning from the inner corner of your eye, and draw a thin line along your upper lash line.
  • Create a small wing by extending the line slightly past the outer corner of your eye.
  • Create a small wing at the outer corner of your eye where your eyeliner ends.
  • Connect the wing to the upper lash line by drawing a straight line from the wing tip to the center of your eyelid. 
  • For a more dramatic effect, apply a darker shade of eyeshadow on the outer corner of your eyelid and blend it into the crease. And curl your eyelashes with an eyelash curler.
  • Finish off the look by applying mascara to your upper and lower lashes. 

Creating the perfect winged liner for a cat eye makeup look is a matter of practice. With regular practice, you can excel at your cat eye technique and create a stunning look.

Eye Makeup Tips

Perfectly done eye makeup can help create a stunning look for any occasion but doing so is a nerve-wracking task, especially for beginners. From choosing the right eye makeup products to trying different eyeshadow looks, there are so many considerations when it comes to mastering the art of eye makeup application.

Beautiful eye makeup
How to apply eyeliner

Here are some valuable eye makeup tips that will go a long way in helping you achieve the desired look with ease. Whether you’re a seasoned makeup artist, a beginner or just starting out, these eye makeup tips will help you master the art.

  • Start your eye makeup look with a clean eyelid. Apply a gentle cleanser to wipe out any deep-seated dirt or makeup residue, and then apply an eye makeup primer. It will help your eye makeup products stay in place for longer.
  • Always start with a small amount of eyeliner and build it up gradually to avoid mistakes and achieve a more precise line.
  • Use tape or a card to precisely apply eyeliner and ensure both eyes are symmetrical.
  • If you’re new to eye makeup, start with a pencil liner before moving on to liquid or gel liners.
  • Curl your eyelashes with an eyelash curler and apply mascara to your upper and lower lashes for a more dramatic effect.
  • Don’t hesitate to use false lashes for extra drama.
  • Practice with different colors, eyeliner styles, and techniques until you master the look that works best for you. 
  • Experiment with different eyeliner shapes to find the look that best suits you.
  • If you have hooded eyes, a softer cat eyeliner with a shorter wing that is directed more upwards will look good on you.

You May Like Reading: Semi Permanent Makeup – The Hottest Tattoo Trend

Final Thought

There are countless eye makeup looks you can try depending on your unique style, eye shape, feature, outfit, and occasion. Whether you prefer a no-makeup makeup look or want to create a bold style statement, there is a look for everyone.

All you need to do is to experiment with different colors, techniques, and products to find the best look for you that accentuates your style and personality. With practice and patience, you can excel at the art of eye makeup and will turn heads wherever you go.

Also Read: Top 3 Multitasking Makeup Products To Glam Up Your Look In Minutes!

Exit mobile version